How to Create a New Fee that Requires Full Payment
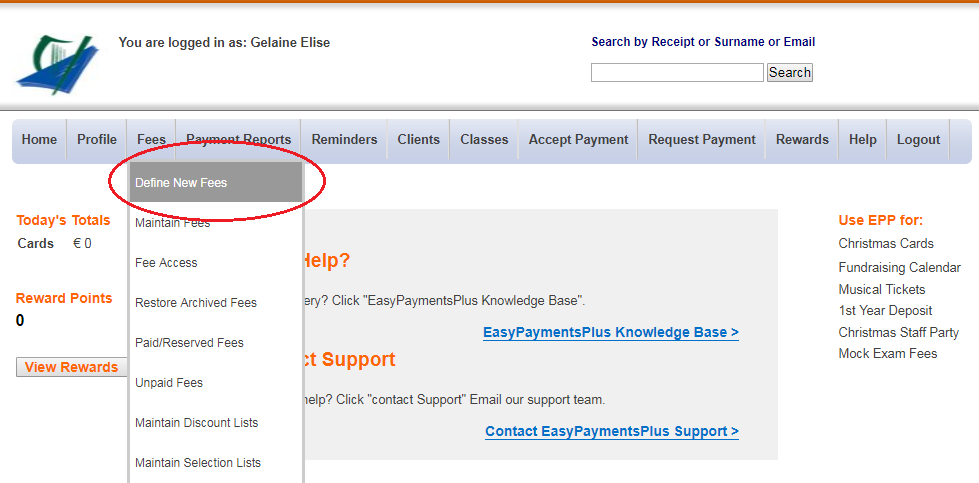
Step 1: Click Fees and select Define New Fees in the drop-down options.
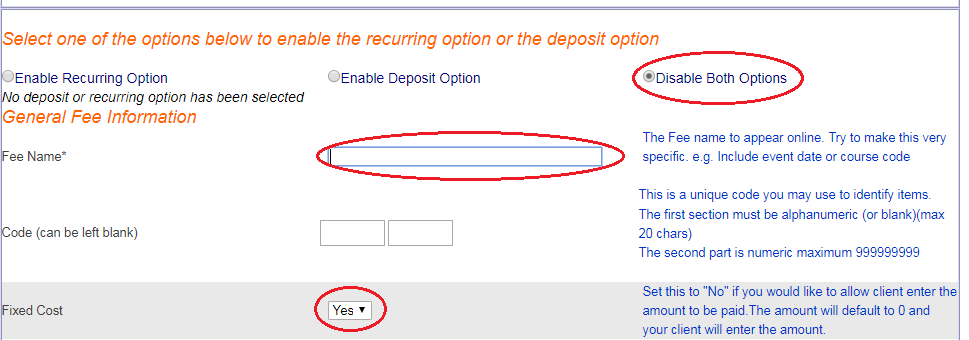
Step 2: Select Disable Both Options.
Step 3: Type in the Fee Name in the text box provided. This will appear online to the public when making payments.
Step 4: In the Fixed Cost section:
(a) Click Yes, if you would like the fee item to charge a fixed amount.
(b) Click No if you would like the client to enter a fee amount at the time of purchase, i.e. a variable amount.
Step 5: In the Fee Cost section:
(a) If the fee item is a fixed cost, enter the amount customers are required to pay.
(b) If the fee item is a variable cost, this will default to 0.00.
Step 6: In the Fee Type section:
(a) Select the relevant fee type from the drop-down options provided.
(b) If a suitable fee type doesn't currently exist, create a New Fee Type in the field below.
Step 7: In the Quantity section:
(a) Enable the Quantity to Yes- if you would like to allow clients to purchase multiples of a product.
(b) Disable the Quantity to No- the default quantity of 1, will only permit the client to purchase 1 of this fee item.
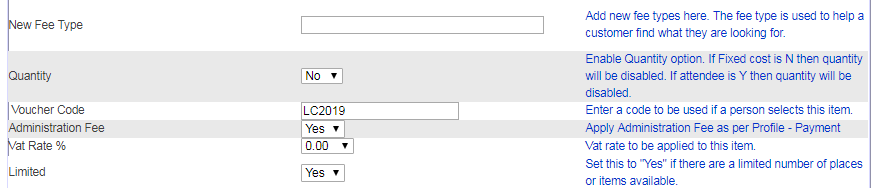
Step 8: Voucher Code- Enter a voucher code if you have a fee for specific clients to whom you have already issued a code.
Step 9: Administration Fees- Select Yes to pass on these costs to the client.
Step 10: VAT Rate- Select the appropriate VAT Rate to be applied to leave the VAT rate at default, 0.00%.
Step 11: Limited- Click Yes in the Limited section if there is a limit on the quantity available of a fee item, e.g. limited number of places in a class/ tickets to a show. Then enter the maximum number available in the box below.
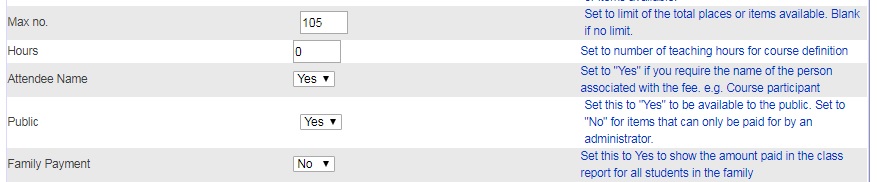
Step 12: Attendee Name- Click Yes to allow payers to select the name of the person associated with the fee, e.g. the person attending the trip.
Step 13: Public- Select Yes to allow clients to view the fee online.
Step 14: Family Payment- Select Yes for a fee that relates to more than one family member, e.g. voluntary contributions, family annual contribution. The family payment will be visible in your reports and will show the payment beside any family member, to whom the fee relates, as having been paid.
Step 15: Discount Information- Select the type of discount from the drop-down options in the discount menu.

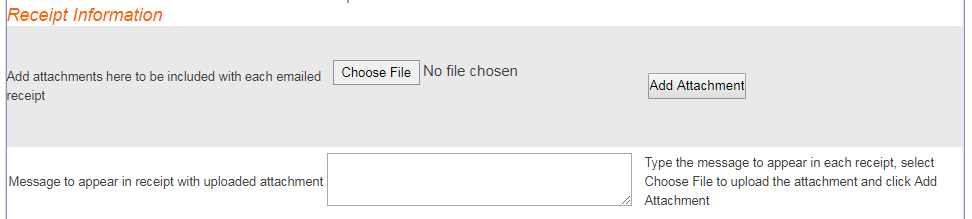
Step 16: Receipt Information- receipts are fully detailed so additional text is typically not required, i.e. unless you wish to pass on a specific message.
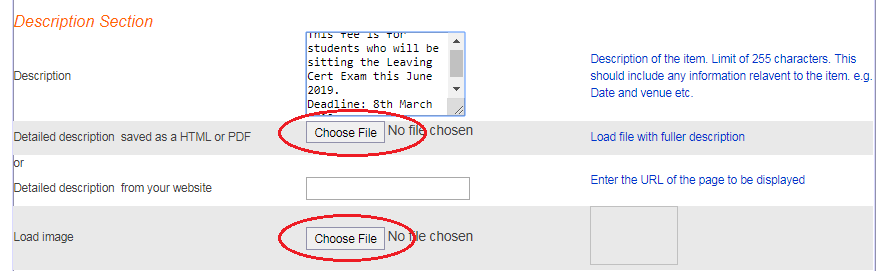
Step 17: Description Fee- Fill in a description of the fee in the text box to share as much information to the client in relation to the details necessary, e.g. venue, date, time, instalment options.
Step 18: Questions/Selection List- Use this section for any question you may have relating to the fee. The first comment box is optional.
- Questions 1-3: free form answer questions.
- Question Selection List: multiple choice questions.
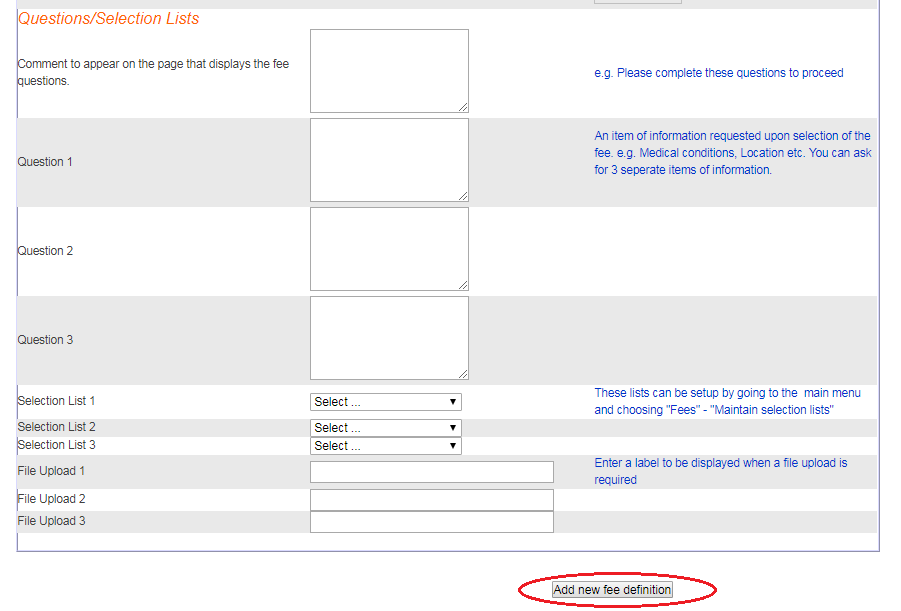
Step 19: To save the new fee, click Add New Fee Definition.

For annual accounting purposes, it is recommended to use the Term in which the fee is paid for, e.g. Spring/Autumn, Term 1 or Term 2.

A variable cost is ideal for donations and fundraisers.
The client can increase the quantity purchased by click the up/down button in the check box on the right-hand side of the fee.
- Enable quantity to Yes- this is suitable for the purchase of multiple of tickets, e.g. shows, raffles and events.
- Disable quantity to No- this is suitable if the Attendee Name is required, e.g. Leaving Cert After-School Study.
Attendee Name- This is very important so that when you run a report, you can easily identify those that have paid for a fee and those whose fees are still outstanding.
If you have selected Yes for Quantity, Attendee Name should be No.
If Family Payment is switched to Yes, Attendee Name should be switched to No.
Ideally, discounts must be created under Maintain Discounts before the fee is created. If you have not yet created the discount, you can edit the fee item and add the discount afterwards.
Visit our other how-to-articles for more tips:
The question selection lists should be created under Maintain Selection List on the Fees drop down menu. If this hasn't been created, you can finish creating your fee and then create the multiple choice answer question and add this to the fee item afterwards.
